If you are interested in adding another level of realism to your models, consider adding back lighting to your instrument cluster. I developed a method for this several years ago that works for most models. To get started, you will need a small piece of clear, thin, stiff plastic and a small LED, wires, a switch, and a watch battery. You will also need basic tools, like a sharp hobby knife and soldering iron.
I will do this in two parts. The first part will be modifying the instrument cluster (or dash) and the second part will be adding the light, wires, battery and switch.
PART 1:
Let's take a look at the parts of the kit we need using the Revell 1:25 shelby as our example.

You need the dash and the decal of the instruments. If your model doesn't use a decal, please continue reading and at the end I will talk about other options.
The first step is to remove the area of the dash where the decal will be. This can be done with a sharp hobby knife. Be careful. You don't want to remove to much material (or cut yourself).
Here is a what it should look like.

You will notice it looks like I could remove a little more form around the top, but I will leave it for now.
The next step will be to cut a piece of clear plastic to fit into the hole you just made. You can use the decal as a template. This is the hardest part of the project, so take your time. Make small cuts and check the fit often. Small gaps can be filled, so it doesn't have to be perfect perfect. Just almost perfect.
When the parts fit as good as you can get them, they can be glued together. But first, the dash should be painted. When the paint is dry, install the clear part and glue it from the back side. The choice of glue is up to you, but do not use a glue that would be thin enough to run through any gaps. You will also need to paint the entire back side (execpt the clear part of course) with several layers of flat black paint. If you do not, the light could 'bleed through' and give a glowing dash affect.
Here is the decal on the plastic prior to cutting. I used the decal as a template because of the shape. If it were square, I would not need to do that.

Here is the part cut out and fit in place. This is not glued in place yet.

By placing a light behind the dash, you can get a good idea of what it will look like. Experiment with different colors and brightness to get the desired effect. As you can see, even with the dim red LED, the light can bleed through the unpainted plastic.

For this project I will use a white or blue bright LED. The black in the decal looks like it should block the light ok to let the dials and numbers show. If it's too bright, I can dim it with a resistor. All of this will be covered in part two.
I can't wait to buld this Ducati. Just looking at the box screams "light me up"! There is no reason why I can't add backlit instruments as well as head light, tail light, and turn signals.

This one is gonna be fun!

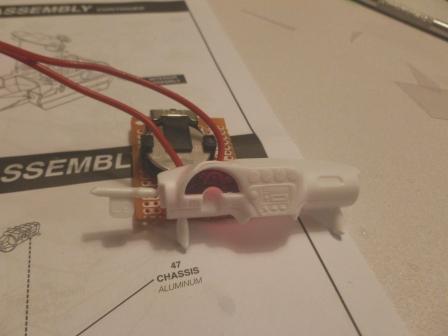
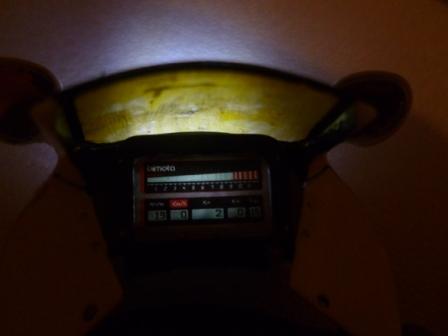
So you don't want to wait for me to finish these, so let's look at one that's done. In fact, this is the very first model I did this to back in 1998ish, so the batteries have long since died. This is by far one of my favorite bikes of all times. One day I will rebuild this kit or better yet, use it as a blueprint to scratch built a quarter scale model. It is the Bimota Tesi. The kit is the Tamiya 1:12 model. It's a small model, but I managed to add not only the backlit instruments, but headlight, taillight, and flashing hazards. Everything comes on when pressing the license plate.
Since the batteries are dead, I had to take it apart to show the lights.

Here it is.
Yes I know, the wind-screen needs to be retented. You're not supposed to be looking at that anyways.
The light that shines through to the instrument panel is same light used for the headlight. The LED faces forward for the headlight and it is just below the instruments, so the light coming out of the side of the LED is dimmer and lights up the panel nicely.
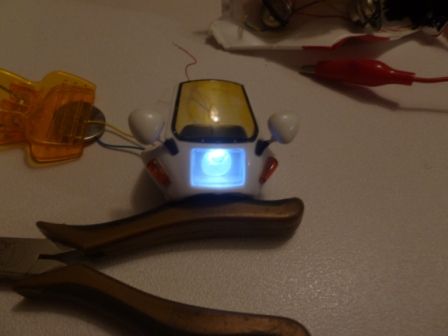
It's hard to see what's going on with all that black paint, but that's what is preventing any light from showing through the white plastic. Two wires go to a single white LED that is used for both the head light and the instruments, and the other two wires are for the turn signals that flash as hazards. The rear hazards and tail light come on with these when the license plate is pressed.

PART TWO:
I will someday have and article on electronics, so I will not go into a lot of detail of that here. Untill I do, there are lots of other resources online if you need it.
To get started, you will need to choose an LED. The size and color are up to you and the model.
First, solder some lengths of wire to the LED and glue the LED behind the clear lense you made.
Second, make a cover out of stiff paper or thin plastic to go over the LED to shield any light from leaking out. Glue that in place all the way around then paint it black. This cover should be no smaller than the clear lense you made and should touch the back side of the dash all the way around. Again, the goal is to not let any light shine where you don't want it to.
Next, you need to decide where to place the batteries and the switch. If possible, pick a spot for the batteries that will be easy to access when they die. solder the wires from the LED, to the switch and battery. Since we are using a single cell watch battery, we don't need a current limiting resistor. If you have the room for a 9v battery, you will need a resistor. The size depends on the LED. There is a lot of info online on choosing the correct resistor for LEDs and I plan on having that as part of another article on this site as well. You can also purchase LEDs with a resistor already built in. However you do it, make sure you build the circuit and test it before gluing it into your model. Other than that, you are just making a simple circuit, being careful to rout the wires out of site as you go. Just in case you are not familiar with LEDs, they are polarity sensitive, so if it doesn't light up, swap the wires around on the battery.
That is basicly it. It may be a good idea to practice on some cheaper models first, but when done right, it really makes a model stand out from the rest.
Now if your kit does not use decals, chances are the instrument faces and dials are molded into the plastic. In this case, try painting the backside black, except for just behind the guages. Then paint the guages black and lightly sand off the raised surfaces to remove the paint from them. Put a light behind it and see if it shines through. Again, practice this on a cheap model first. If you discover a diferent or clever way to do this I would love to hear about it, and with your permission add it to this article.
Thanks for reading and Good luck.